We really wanted to run ZFS on our NAS for best data integrity. Our previous experiment with FreeNAS showed disappointing performance with ZFS. Our final hope is to go to the home of ZFS, Solaris. This is where we’ll find the best performance.
Solaris as such isn’t really a thing any more, however, there are various open source forks which are still being maintained. We chose OmniOS, a complete Solaris-like distribution based on the Illumos kernel, and currently at r151020. The other contender was OpenIndiana, but that didn’t have driver support for our X557 10Gbe ports.
As with FreeNAS, we had to use dd on a Linux box to create USB installation media, and we used a different, identifiable, USB stick as our installation target. Installation went smoothly and all our storage and network ports showed up. It’s been nearly 20 years since we did any work on a Solaris box, so we had to resort to much googling to set up the network ports and storage the way we wanted. By this time we had some additional storage too. We had installed two Samsung 1TB 850 Pros, in addition to the SM951, with the intention of striping them to get the performance we need to match the 10Gbe network.
After much mucking around with ZFS basics, we had a mirrored boot (USB) drive (taking up both the USB 3.0 ports on the rear I/O panel), a ZFS vdev consisting of the two 850s striped for performance, and another vdev which was the SM951. We set up some SMB shares and connected our X99 Windows 10 client with its X550-T2 network card.
Interestingly, the performance of the 850 pair and the 951 over the network shares was comparable. Reads were around 900MB/s and writes were around 300MB/s.
We also tried a single 850 Pro and got reads of 500MB/s and writes of 300MB/s.
So it looks as if we can’t do anything to improve write speeds. Striping doesn’t seem to make any difference, but our reads are just what we hoped for.
This server is now in use as VM storage. VMs boot up and shut down nice and fast, and we’re happy. The box is effectively silent and idle power consumption is around 35w (with 4 SSDs and an M.2 installed) which is higher than we’d hoped, but in the scheme of things it’s pretty good, especially considering the performance we’re getting.
Having proved the concept we felt confident splashing out on the final components – the case and mobile rack.
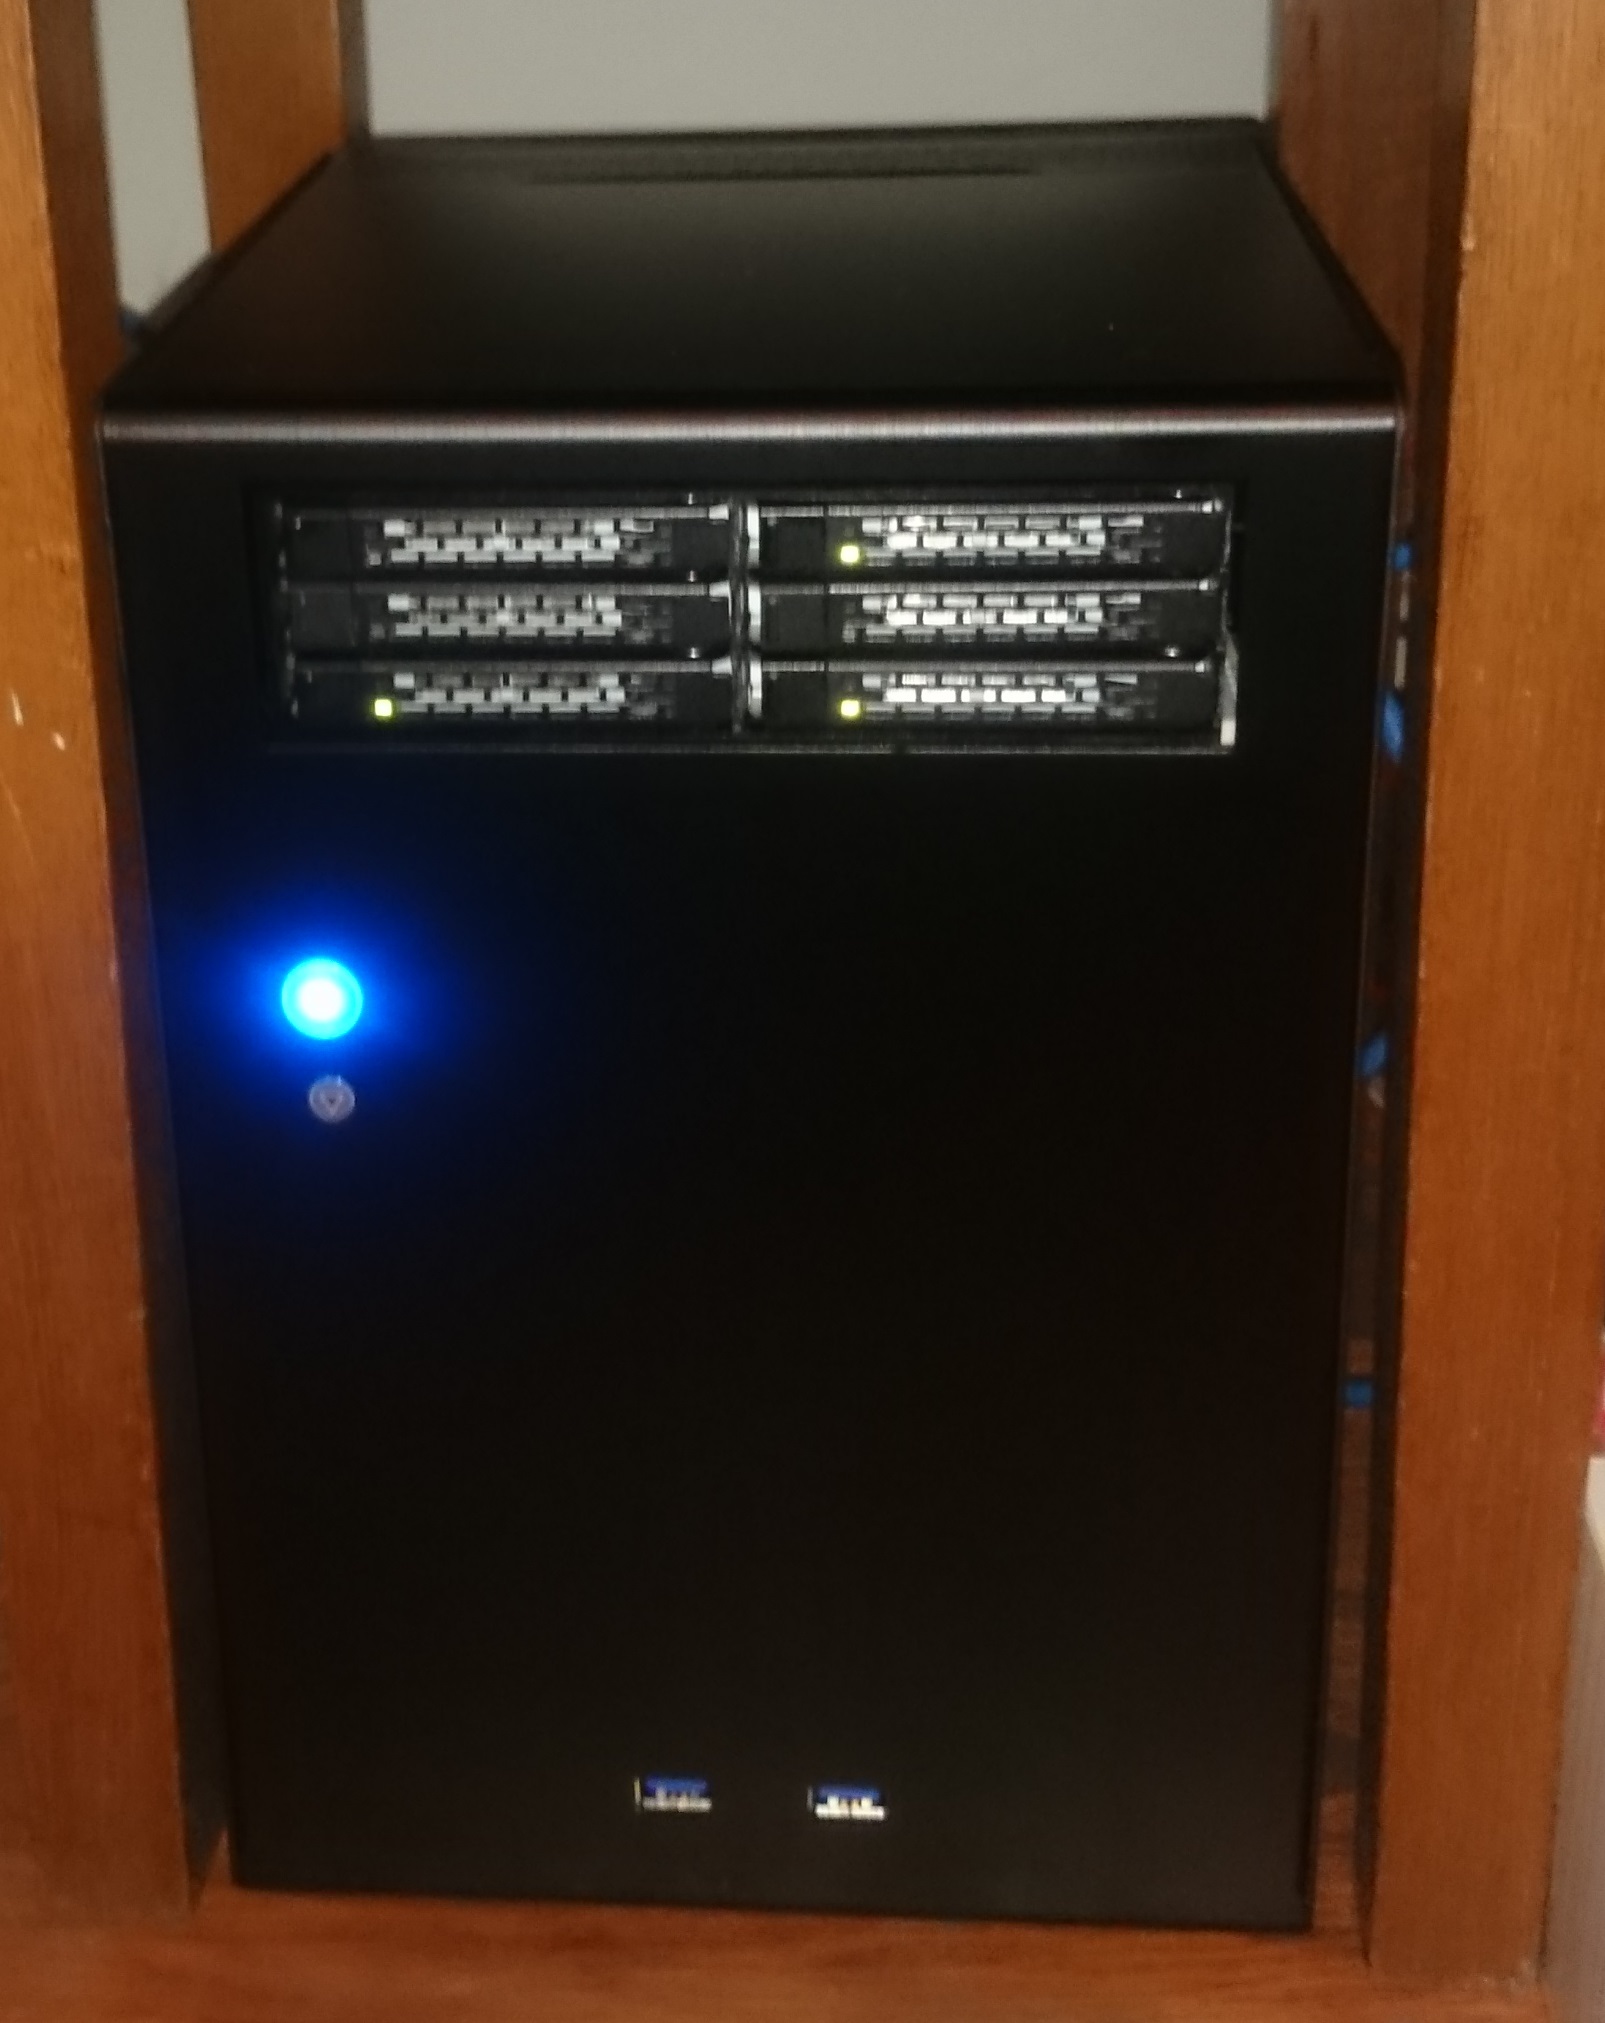
A lot of research and head-scratching went into the case choice – more so than any other component. We wanted small size and more importantly small footprint above all else. Also remember that we have low noise as another criterion so the components will need some space to breathe, and we won’t be relying on small noisy fans. Since our motherboard has six SATA ports for hard disks, we wanted the ability to install up to six SSDs, and ideally they should be in externally accessible bays. The Icy Dock MB996SP-6SB six-drive mobile rack caught our eye, and this meant we needed a case with an external 5 1/4 inch drive bay.
This mobile rack has a fan at the back with two speeds and off selectable from a switch. Since we’re using low-power SSDs, and this mobile rack isn’t particularly dense (they do an eight-disk one in the same size), we switched it off.
Having researched pretty much everything on the market, and after somewhat reluctantly eliminating the Silverstone CS280 and CS01-HS (both are bigger), we went for the Lian Li PC-Q07 (sadly now discontinued). This has the requisite 5 1/4 inch bay and a very small footprint thanks to vertical motherboard mounting. It also has space for a single 3 1/2 inch drive if we ever need it. It has no space for case fans and is designed for passive convection cooling. It even has a small hole at the back at the bottom, next to the expansion card slot, where we could mount our power supply inlet. Sounds right up our street.
We quite liked the silver one but the mobile rack was only available in black, so black it had to be.
Assembly was reasonably straightforward. The only slightly tricky thing was that the motherboard mounts to the side panel, and both side panels have to be removed to fit anything into the 5 1/4 inch bay. Remember to fit the 5 1/4 inch device first (and attach the SATA data and SATA power to Molex adapter cables at the back – you won’t be able to later), then install the motherboard. Although the case has two USB 3 ports, the motherboard only has a USB 2 header. Fortunately Lian Li thought to include a USB 3 to USB 2 converter. We also fitted the ultra low noise adapter to our CPU fan in order to reach our noise targets. The six SATA cables were connected to the motherboard and the two power adapter cables were attached to the power supply (two SATA power to Molex adapter cables are included with the mobile rack). The PC-Q07 has space for an ATX power supply which we’re not using of course. We found a blanking plate on eBay to cover the hole. The only other thing to mention here is that this case in black is a fingerprint magnet. There was lots of wiping with microfibre cloths when we finished!
Having connected the power, it just remained to plug in our USB boot drive at the back and connect all three ethernet connectors. One of the ethernet connectors is the IPMI management port, so that went into our gigabit switch with DHCP addressing. (Update: IPMI firmware 3.46 is now available for this board and updates remote console to HTML5 instead of the nasty Java thing that relied on Internet Explorer; we installed it immediately.) We also connected one of the two 10Gbe ports to the same switch; this gives our machine internet access. The second 10Gbe port was connected to our client machine which had the X550-T2 card installed, and both ends of the 10Gbe link had static addresses on a different network segment. This allowed performance testing at maximum speed. We don’t have a 10Gbe switch yet (we like the Asus XG-U2008 but we’re waiting until they do one with more than two 10Gbe ports).
We have a number of candidate operating systems and disk formats which we could run on this system. The requirement is Windows or CIFS shares. So we have plain old Ubuntu Server with Samba, on ext4 or ZFS disks, Windows Server 2016, FreeNAS, NAS4Free, and the Omnios/Napp-it combination if we’re feeling really amititious. We started off by ordering a bunch of these:
Inevitably we tried the easiest first. FreeNAS 9.10 was first up. The ISO went onto one of the USB sticks and a fresh stick went into the machine as an install target. We had to use Linux and dd to write the ISO to the USB stick; Rufus wouldn’t have it. When you boot the Supermicro (F11 for boot menu), what’s nice is that even though the installer USB and the target USB were identical, it didn’t show the installer USB as a possible target, so there was no confusion about where to install it. Installation went smoothly. Once FreeNAS was up, it’s just a matter of pointing a web browser at it. The only things to do were to create a volume using the SM951 and a shared folder under it, create a user, then ensure the user owns the share.
To connect the two machines we used just a straight 10m Cat 6 patch cable and static IP addresses using a different subnet to the rest of the network. 10Gbe has auto-crossover built in so you don’t have to worry about that any more. (During install we had the cable plugged into the main 1Gbe switch using DHCP so we had internet access in case it was required for the install.)
We pointed Windows Explorer at the share, entered the username and password, and bingo. We have a NAS. We found a 5GB DVD rip to test with and dragged it to the share. We saw about 150MB/s. Disappointing. Then we dragged it the other way, back off the share, and saw about 300-400MB/s (bouncing around quite a bit). Better but still disappointing. Then we remembered about jumbo frames. We set up the client NIC (the X550-T2 if you remember) to 9014 frame size in Windows 10, and the server mtu to 9014 using ifconfig in the FreeNAS shell at the console. Upload increased to about 200MB/s – still disappointing, and download increased to… 1GB/s! Yay! That’s what I’m talking about!
This is good. It means several things. Firstly that our trusty old 10m Cat 6 cable is capable of negotiating a 10G link. Secondly it means the X557 network drivers in BSD are up and running. Thirdly, and most importantly, it means the CPU on the server is capable of saturating a 10G link on an SMB share. This is big news. We’re essentially home and dry. We spent a lot of money to get to this point with no guarantee of success, but now we can go ahead and spend some more on the rest of the system (like a case!).
FreeNAS uses ZFS of course, and the way ZFS writes files is quite complicated. Firstly it’s a copy-on-write filesystem, which means that data is never overwritten. If you write the same file twice, the second copy is written to an unused area of disk, and only when it is verified as having been written correctly (and its checksums calculated and compared) is the old copy released. Furthermore, writes are cached. If you only have one disk, they are cached to that disk, then read off again and re-written to a permanent location on the same disk. This is quite arduous, even for an SM951. It’s not surprising that writes are significantly slower. There’s also the issue of synchronous and asynchronous writes. The default setting of synchronous adds even more delay. Your humble correspondent is not going to write a diatribe on ZFS inner workings and tuning here; the internet is already awash with such things, written by people much better qualified. But we have an understanding of why our writes are not as blistering fast as our reads. In fact, searching the web for reasons for slow writes to ZFS we find many stories of people complaining of 10MB/s. We consider ourselves fortunate.
We suspect ZFS will never give us writes anywhere near 1GB/s, at least not without considerable research, experimentation, tweaking and tuning. Please feel free to chip in in the comments if you have any experience of this. Ideally we’d like it not to try to cache at all, and just write to the M.2 drive straight off. Anyone know how to do this? Also we’re not averse to a bit of asynchronous writing (although on paper it shouldn’t be necessary – the drive is faster than the link). Fiddling about with aio_fork on the SMB share didn’t seem to do much.
So armed with our newly and expensively acquired knowledge, we move on to Ubuntu Server 16.10 and ext4 in the hope of finding the goodness of 1GB/s writes. On this occasion Rufus does the business with the ISO quite happily (select dd format when given the choice), but the issue of having identical installer and target USB sticks leads us to come unstuck. The Ubuntu installer is not clever enough to remove the device that it is running on from the list of possible install targets. If you are installing to a USB stick, make sure you have two different ones that will identify differently (different capacities is ideal – we had a 16GB and a 32GB, both of which are more than big enough). Choose to install the Samba server when given the opportunity during the install so you don’t have to install it manually later. The SM951 was still formatted as ZFS from the FreeNAS install so it didn’t show up, although it was present as /dev/sda. A quick parted sorted that out and mkfs then turned it into ext4. It’s then a simple matter to mount it under your home directory. Don’t forget to change the ownership from root otherwise Windows won’t have a hope of talking to it. Then it’s a little bit of jiggery pokery in /etc/samba/smb.conf, set up jumbo frames again, and you’re off.
So, back to Windows 10 and mount the share. Drag the DVD rip onto the share and… 900+MB/s! Not disappointed anymore. Drag it back – 1GB/s. Nice. Just for fun we took an 80GB VM file off the Qnap and plonked it on the Win10 machine. That took about 12 minutes (showing 112MB/s – pretty good for 1Gbe). Drag it to the I Need NAS share and it wrote in about 1’30”. Drag it back and it read in about 1’15”. That pretty much bears out what we saw. Reads about 10% faster than writes. I’m happy with that.
When he just had to go faster, Brian O’Connor knew what he needed.
Here at MMIT, we need to go faster too. We’ve had a QNAP TS-453S Pro NAS unit for a couple of years. We chose it because its use of 2.5 inch drives makes it much more compact than a NAS that uses 3.5 inch drives, and also because we were intending to use SSDs in it. The main reasons for this were low noise and low power consumption, but also so we could guarantee to max out its two 1Gbe network connections for two users simultaneously.
But now our use case has changed and we are doing quite a lot of virtualization. VM files can be 100GB and larger, and waiting for them to copy, back up, or even load from a share was getting tedious, so we starting thinking about 10Gbe. Qnap’s 10Gbe units are large, expensive and loud, so we started to think about designing our own.
We wanted it to be silent (or as close as we could get), low power consumption (so it could be left on day and night for remote access), as small as possible, as cheap as possible, to have the ability to saturate a 10Gbe link, to house several terabytes of storage (although not dozens – we’re going to have to go with flash after all, to get the performance and the quietness), and, ideally run ZFS, for best data security. That’s quite a set of requirements to juggle.
“I need one of these, one of the big ones, no actually, let’s make it two”
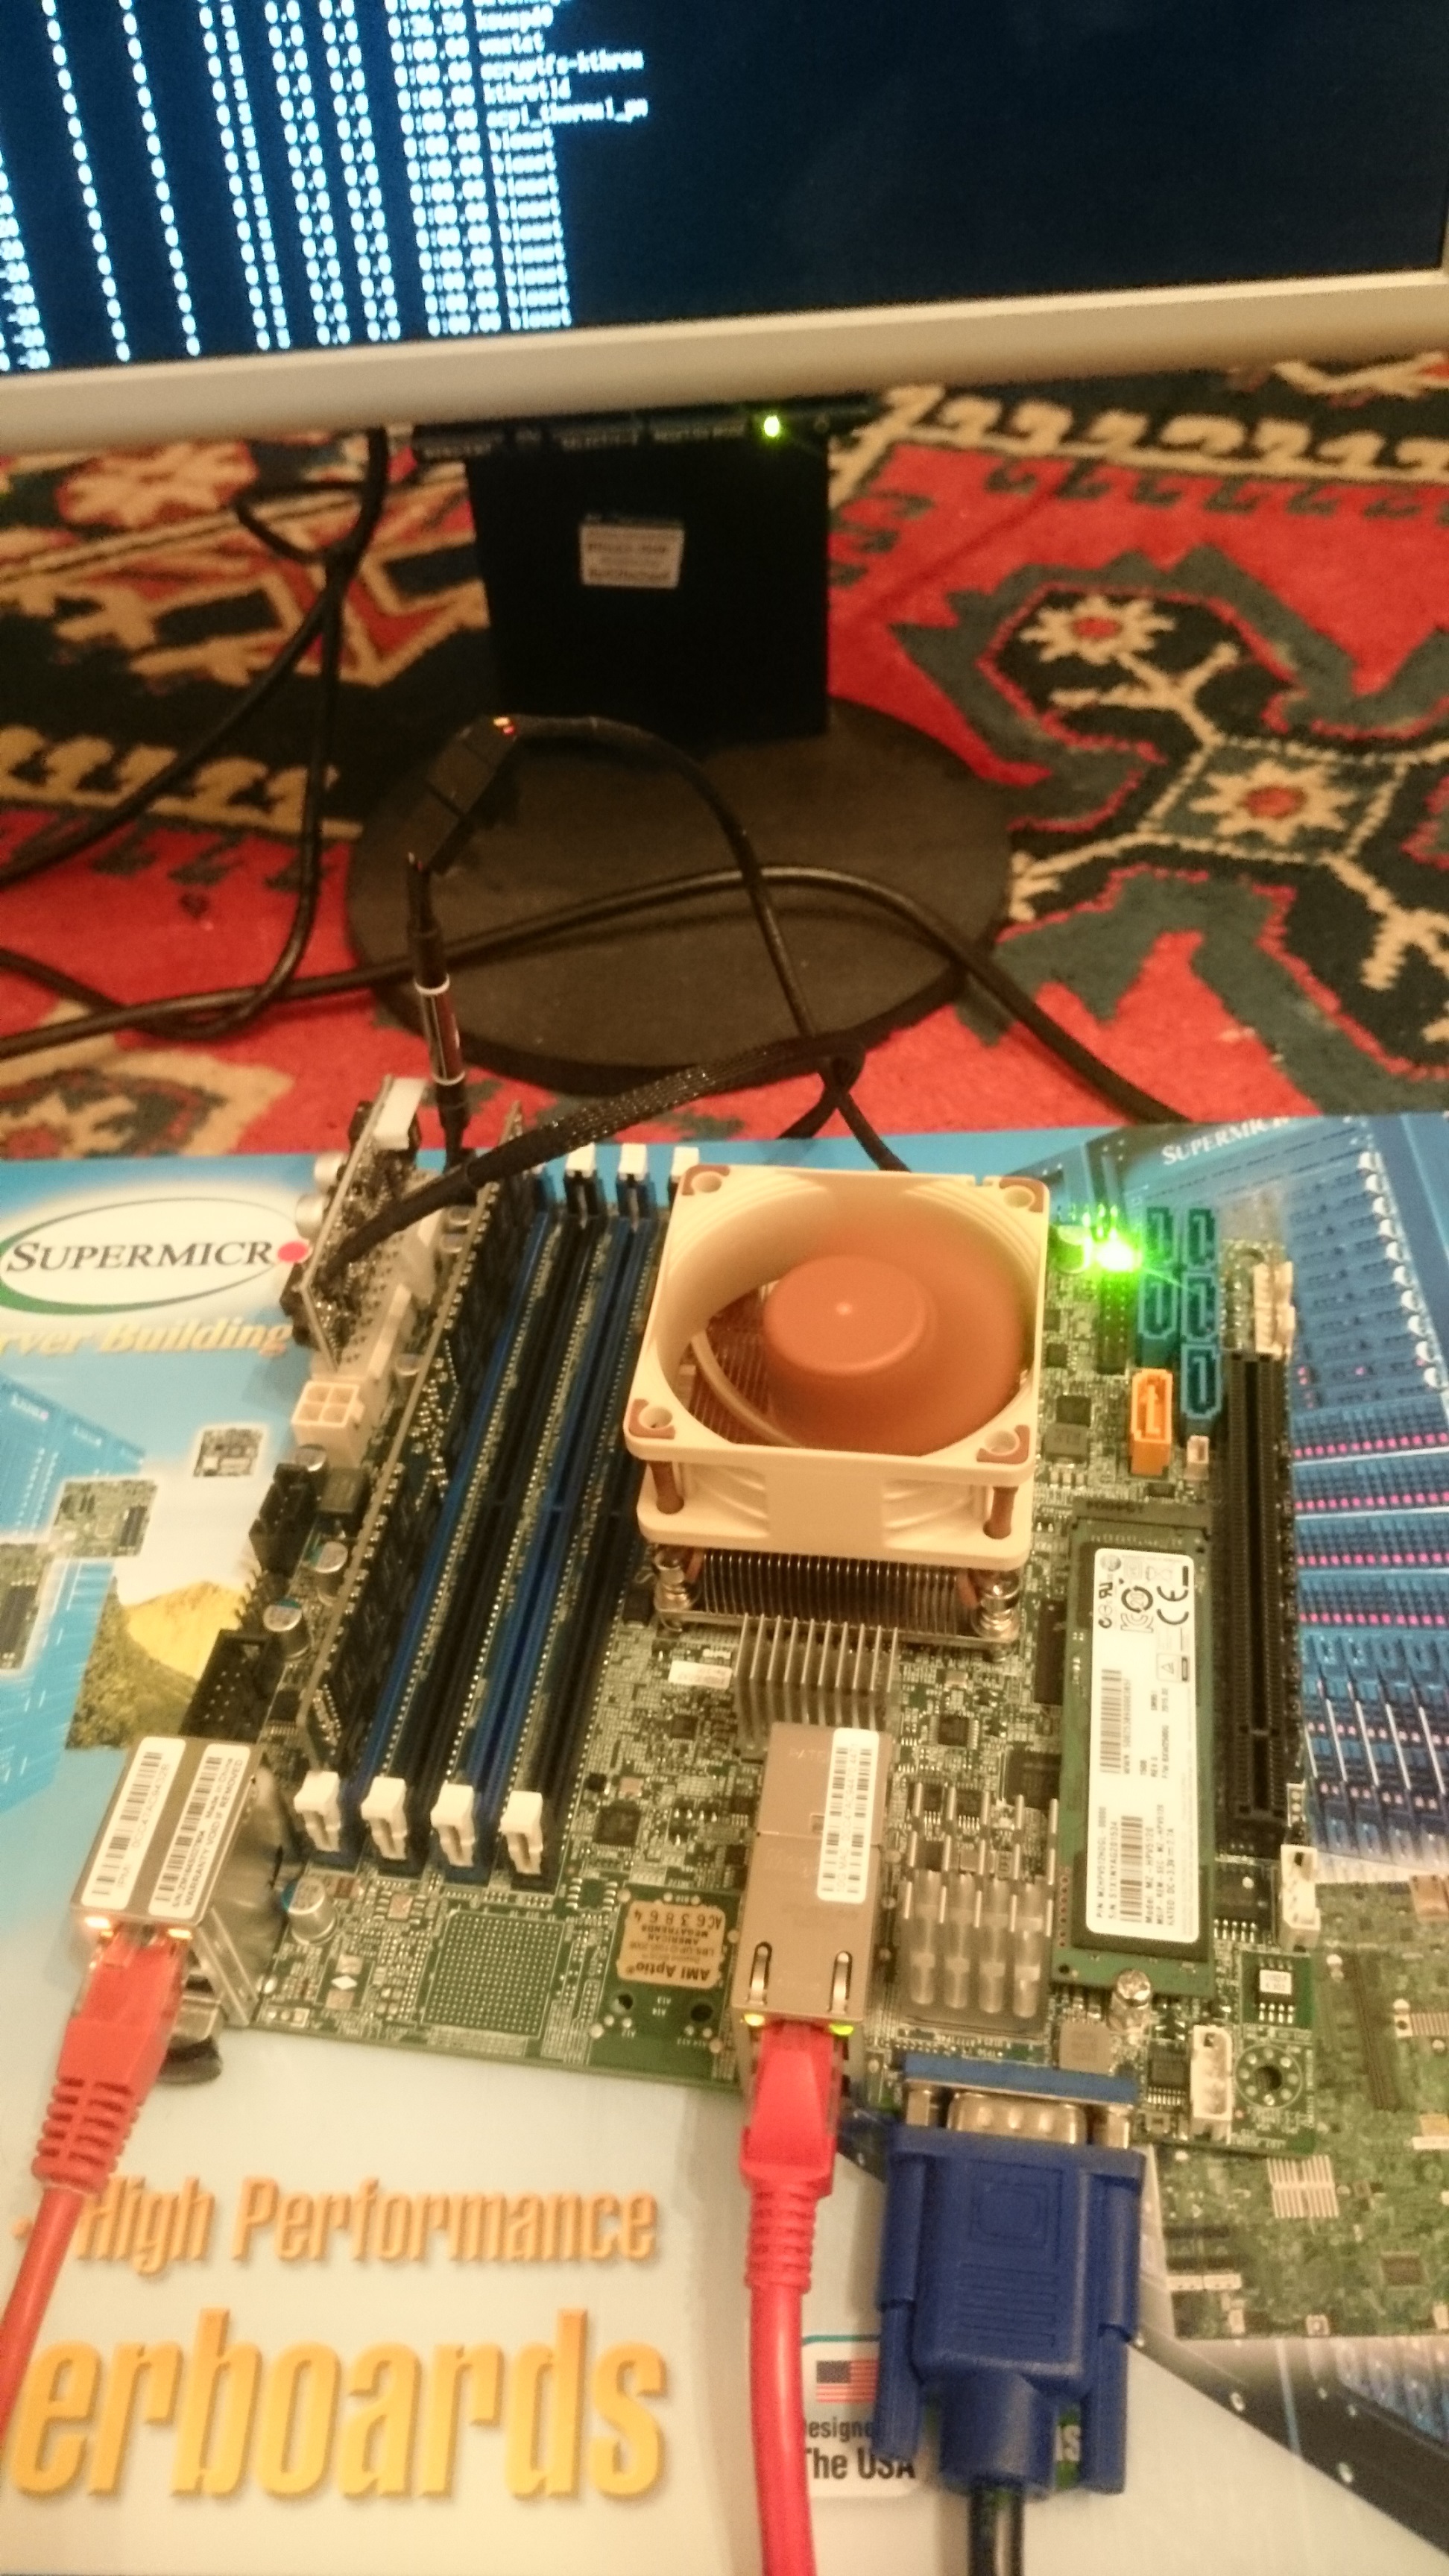
The Intel Xeon D was the obvious place to start, as this SoC is very power efficient and integrates Intel X557 10Gbe right on the chip. Supermicro makes a wide range of mini-ITX motherboards with these chips on, with 10Gbe RJ45 ports. (Yes, SFP+ is more power efficient, but we went with RJ45 for backward compatibility with 1Gbe and existing (short) Cat 6 cabling, and ease of use. Port count is going to be low.) The lowest TDP available for one of these CPUs is 25 watts, so we went with that (silent, low power consumption remember). The motherboard we chose was the X10SDV-2C-TLN2F. This has a 2-core, 4-thread Pentium D1508 (a Xeon in all but name, still supports ECC RAM and has the all-important onboard X557). We don’t need a particularly beefy CPU for this server. It might do some transcoding but it’s unlikely to be more than one stream at a time. The main concern was that Samba shares are single-threaded and need decent GHz to max out a 10Gbe link. This one is 2.2GHz with boost to 2.6. That’s as high as we could get in a 25w TDP. We didn’t know if it would be enough, but it was all we had.
To that we added a 32GB stick of Hynix ECC RAM from Supermicro’s compatibility list. The motherboard has four DDR4 DIMM slots so this lets us retain the option of maxing out the RAM at 128GB in the future if desired. FreeNAS will use everything you can throw at it, right? And yes, we’ll only get single-channel performance for now but…
The motherboard has a 1U high passive heatsink over the CPU, designed for a 1U chassis with front-to-back airflow provided by noisy datacentre-style fans. We can’t be doing with that. This will not be rack-mounted anyway. We got a Noctua NF-A6x25 fan for the CPU, and we’ll probably have to hot-glue the rubber mounting pins to the heatsink. At least the mounting holes line up with the heatsink bolts. Props to smithydll on YouTube for his tip about this fan. https://www.youtube.com/watch?v=mgswfpkkoMI
We went for the FLX version, that comes with the low noise adapter and the ultra low noise adapter rather than the PWM version which adapts its own speed, because we wanted to have absolute control over noise. We would monitor temperatures carefully.
We couldn’t see this system drawing any more than 100w under any circumstances and probably no more than 50w under any realistic load, so we chose a Streacom Nano 120w power supply. This has an external power brick meaning less heat in our case, and is fanless and therefore totally noiseless.
We were taking a risk here. I remember servethehome reporting that a X11SBA-LN4F wouldn’t post with a Mini-Box PicoPSU, which is a similar design. We really didn’t want to go even down the SFX route (let alone plonk for an ATX) due to case size constraints, efficiency concerns, heat and noise, so we took the plunge and ordered.
We’ll come on to storage later. For initial testing, we had a 512GB Samsung SM951 lying around, which should be fine for network performance testing with the various candidate operating systems that we have. It should easily allow us to max out 10Gbe in both directions, and it fits neatly into the M.2 slot on the motherboard. (Currently out of stock at the link below where I got it, but don’t worry, 960 Pros are out now!)
Everything went together pretty well. We tried the CPU fan without any speed reduction at first. We plugged the IPMI port into our main 1Gbe switch, touched the two power pins together with a screwdriver tip and held our breath. The fan spun. The green LED glowed. Phew. The PSU is compatible. That was a big relief! After this stage you can just switch it on and off from the IPMI. The only other thing we did at this stage was flash the BIOS to 1.1c which we found on the Supermicro website. We were hoping to find updated IPMI firmware too, but no dice yet. The current firmware uses a clunky Java remote console which only works with Internet Explorer (what’s that?). Some Supermicro Xeon D boards now have a nice new HTML5 version but I guess we’ll have to wait for that. The fan ran at 2800 rpm and was a bit noisier than we’d hoped but we had plenty of scope for making it quieter later. Temperatures settled down to 28 C at the CPU and 42 C at the 10G chip at idle.
Just for fun we took the fan off the CPU to see what would happen. The CPU temperature rose steadily and reached 65 C after about 10 minutes. The 10G chip was pushing 70 C. Both were still rising at this point and we chickened out and put the fan back on. If it’ll do that at idle with no case we certainly won’t be able run it fanless. Ah well.
As this is our first 10Gbe system, we need a client system to test it with! So finally we bought an Intel X550-T2 for one of our X99 Windows 10 client systems, and plugged it in.
Thanks to Paul Braren at TinkerTry for his ceaseless research on Supermicro Xeon D boards. Without you this would not have been possible. https://tinkertry.com
MMIT Ltd is a provider of IT services to domestic and small business clients, based in Oxford.
We are specialists in the supply and installation of PCs with small physical footprint, low power consumption or low noise (or any combination!). We have installed everything from 24-core workstation monsters to tiny, silent web browsing machines. We also advise on networking, wi-fi and internet connectivity, and can supply and install networking equipment. Domestic wi-fi solutions are a speciality; many houses are difficult to cover throughout, and at MMIT we have experience of providing coverage where simple off-the-peg routers can’t cope.
We also offer contract software development in C++.
Call MMIT Ltd to discuss your requirements on 01865 368313.